 Whether you like your buttermilk biscuits round or square, the perfect biscuit has to be flaky, tender, and buttery. These buttermilk biscuits meet all those and more by using the right ingredients along with technique. The result is biscuit perfection.
What can be better than a hot flaky biscuit begging to be separated layer by layer? A biscuit slathered with butter and drizzled with honey. Some may be intimidated by making these, but don't fret. This is an easy recipe that anyone can master.
Coming up with an appropriate title is sometimes challenging. Some of the contenders were:
- Big Beautiful Buttermilk Biscuits (try saying that even once after a few drinks or after dental work and the novocaine hasn’t worn off)
- Tall Fluffy Buttermilk Biscuits
- Natalie’s Buttermilk Biscuits Perfected
- And of course the one everyone uses…Best Buttermilk Biscuits
So, why did I choose Heavenly Buttermilk Biscuits? Because they taste heavenly.
To make perfect buttermilk biscuits you need to:
- make sure your ingredients are cold
- add a little cornstarch to create a tender crumb
- add a touch of sugar to bring nice color after baking
- use baking powder and baking soda to give a nice rise
- stack and flatten the dough once rather than multiple times
- refrigerate or freeze for 10 minutes prior to baking
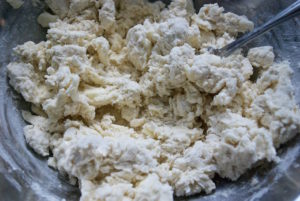

Cut the butter into the flour by using a fork or pastry cutter. There is no need to take out the food processor for this unless you don’t mind cleaning it up. If you do use the food processor, just use it for cutting the butter into the flour then transfer to another bowl and continue with the steps. When adding the buttermilk, add a bit at a time using a fork to mix. Mix just until you have a shaggy dough.

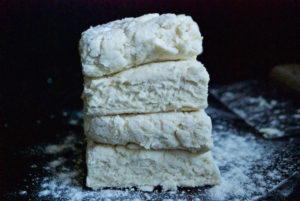
Turn the dough onto the lightly floured counter and gather together. Form into a square that's 1” high - doesn't have to be perfect. Use your dough scraper or knife to cut the dough into four squares. Stack each piece on top of another. Press or roll to a thickness of 1 inch in height.
As for the shape...
Cutting as many rounds closely together, minimizing any excess between them limits the scraps for re-rolling the dough. Rolling and/or handling the dough too much makes the biscuits tough. Keep in mind that biscuits from re-rolled dough won't be as tender as the ones first cut. Gather the remaining scraps, layer on top of each other, press or roll, and cut 1 or 2 more biscuits. Any remaining scraps can make an ugly biscuit. That ugly one is my favorite.
Cutting the biscuits in squares rather than rounds eliminates the need to re-roll scraps.
If you want tall biscuits, you need to have the dough height at a minimum ¾” inches, but best results are 1" in height. You may only be able to cut out 4 (2 ½") round biscuits then roll again and get 1 or 2 more.
If you use a knife for squares, cut straight down and lift knife back up. Don't slide knife across because that will prevent a proper rise. If cutting rounds, use a biscuit cutter or glass rim. Push straight down and lift back up. Don't twist or turn as that seals the edges and prevents them from rising.
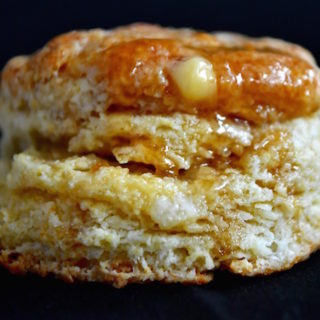
I have to warn you, these are addictive. The tops and bottoms are perfectly crisp and the interior is tender and flaky. Once you slather on some butter and drizzle with a little honey, you'll be in heaven.

Love buttermilk biscuits? Try:
Light and flaky baking powder biscuits
Life is too short for mediocre food.
Have you seen these?
Heavenly Buttermilk Biscuits
PRINT PIN SAVEIngredients
- 2 cups all-purpose flour plus a little more for dusting
- 2 tablespoons cornstarch
- 1 tablespoon baking powder
- 1 tablespoon sugar
- ½ teaspoon baking soda
- ½ teaspoon fine salt
- 8 tablespoons unsalted butter (4 ounces) cold, cubed
- ¾ cup buttermilk*
Instructions
- Preheat oven 425°.
- Line a baking sheet with parchment.
- In a large bowl, combine flour, cornstarch, baking powder, sugar, baking soda, and salt.
- Cut in butter using a fork or pastry cutter until small chunks of butter are incorporated throughout.
- Drizzle buttermilk while mixing with fork just until incorporated.
- Turn dough out on lightly floured counter and gather together.
- Pat dough into a 1"-thick square. Flatten the dough to a square about an 1” in height. Cut square into fourths and stack them of top of each other. NOTE: Do not slide knife across as that will seal the biscuits and prevent rising. Slice down and up. Press down to flatten into a 1" rectangle. If cutting into squares:Cut to make 12 small biscuits or 6 large ones. Because you are making square biscuits, you won't have scraps. If cutting into rounds:Using 2 ½” biscuit cutter or floured glass rim, push down but do not twist because that will seal the biscuits and prevent rising. Use the scraps to make 1 or 2 more. Those won't be as tender but they're still delicious. Continue:
- Transfer biscuits onto lined baking sheet.
- Refrigerate or freeze (if you have room) for 10 minutes prior to baking to harden the butter for better layers. If your kitchen is warm, I highly recommend this step.
- Bake for 20 - 25 minutes, but check at 15 because ovens vary.
- Serve hot with butter and a drizzle of honey. Enjoy.
Notes
Nutritional Information
I don't post the nutritional value because I don't trust the accuracy of the nutritional apps. I’m not a nutritionist and don't want to post misinformation.
More Delicious Breads
See More Breads →











Did you make this recipe? Let me know!