


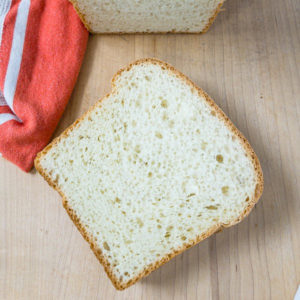
A delicious Single Rise White Bread recipe that makes two loaves of quick, easy, slightly sweet, white bread and only requires a single rise. Perfect for sandwiches or simply slathered with butter.

Bread is one of my favorite things to eat probably something instilled in me because my mom loves to eat bread and butter. When my kids were small she would teach them to ask for "pan con mantequilla" which translates to "bread and butter" and they would ask for it all the time. I would oblige by making a fresh loaf of white bread. I have a few recipes for white bread but this one requires only one rise and is simple to make.

Bread has always been a big part of our daily meal. We would have it for breakfast with our coffee or café con leche - coffee with milk - which could also be lunch, and if we were lucky, we would serve it with our supper. As a kid, I would butter a slice of bread and sprinkle a little sugar on it and either eat it as is or toast it to create a dessert like treat. Even better was opening a can of sweetened condensed milk and spreading just a little on a piece of toast.
When I want to make a quick bread that requires little attention, this is my go to recipe. This recipe is single rise and uses a little more yeast to give it that extra boost to rise quicker.
I use water because it creates a harder crust and water is always available. First, yeast is added to warm water and then sugar is sprinkled to add just a touch of sweetness. Measure out 6 cups of flour and mix with salt. A digital scale comes in handy when measuring out flour for baking. If you do not have a scale, 6 cups of flour using scoop and sweep method should work. Just fluff up the flour, scoop in with your measuring cup, and sweep off the top with the flat edge of a butter knife.
Add the flour and salt to the yeast mixture. Knead for 7 minutes.

After 7 minutes of kneading, you will have this beautiful, soft, elastic dough which you turn out into a very lightly floured board or counter. For posting purposes, I show this on my wooden board but I usually proceed right on top of my granite countertop. It's such a beautiful dough that I can manipulate it without adding any flour.

Divide the dough in half.

Flatten one piece of dough and create a rectangle where the width is the length of the pan.

Fold the top half way down and press down lightly.

Now fold the bottom half up creating a log shape.

The dough will be folded one last time. I make an indentation across the middle.

Lastly, grab the bottom part and fold the dough in half again.

Now pinch to seal.

You should now have a tightly rolled log shaped dough.

Transfer dough into buttered loaf pan seam side down.
Repeat with other half.
Place the loaves on the middle rack of the oven, cover with a clean kitchen towel, and set the oven to 170 degrees. Let rise for 45 minutes to 1 hour. If your oven runs hot, turn off the oven.

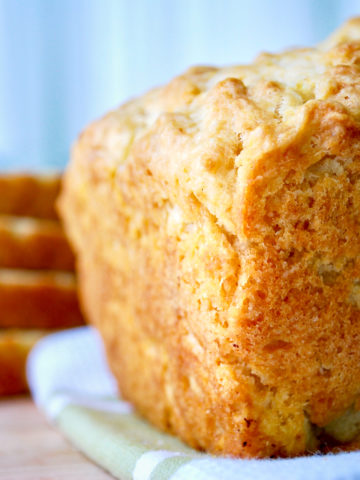
The dough should rise about an inch over the rim of loaf pan. Remove towel and set the oven temperature to 375 degrees leaving loaves in the oven. Bake for 30 to 40 minutes until loaves are golden brown.
Tools to make single rise white bread:

Remove the loaves from the pan and set on rack to cool before slicing. Any way you slice it...Enjoy!
Life is too short for mediocre food.
Have you seen these?


Single Rise White Bread
PRINT PIN SAVEIngredients
- 2 cups warm water
- 1 tablespoon active rise yeast
- ¼ cup sugar
- 4 tablespoons unsalted butter melted*
- 1 tablespoon table salt
- 6 cups all purpose flour weighing 1 pound 13 ounces
Instructions
- Butter two 9x5 inch loaf pans.
- In the bowl of a standing mixer, add warm water.
- Sprinkle in yeast then sugar. Let proof until yeast starts to form - about 5 minutes.
- Add in butter.
- With dough hook in place, add in flour and salt and knead for 7 minutes.
- Transfer dough onto counter - lightly floured if necessary - and divide the dough in half.
- With one half, shape dough into a rectangle longer side facing you, width being same size as length of loaf pan.
- Fold top of rectangle halfway over dough and pinch lightly to seal.
- Bring up bottom of rectangle over to form a log shape. Pinch to seal.
- Form an indentation across the length of the log shape and then fold up bottom to meet top and pinch to seal.
- Transfer dough seam side down into loaf pan.
- Repeat with other half.
- Place loaves on middle rack of oven set to 170 degrees. Cover them with a kitchen towel. If you find your oven runs hot then once your oven comes up to temperature, turn it off and let the loaves rise in the turned off oven. I've found that with my commerical oven, the loaves don't rise as high as when I had my conventional oven and that may be because it runs too hot. The loaves still rose just not as high.
- Let rise for 45 - 60 minutes. The dough should be about an inch over rim of pans.
- Remove towel from top of loaves.
- Set oven temperature to 375 degrees - don't remove loaves. Again, make sure you remove towel.
- Bake for 30 minutes until golden brown.
- Remove loaves from pans and set on rack to cool. Cool before slicing.
Notes
Nutritional Information
I don't post the nutritional value because I don't trust the accuracy of the nutritional apps. I’m not a nutritionist and don't want to post misinformation.
More Delicious Bread Recipes
See More Breads →

Marie
I made this recipe today on a whim, found it googling one proof breads because I was short on time and had a hankering for some gluten. I cut the recipe in half because I was hesitant to do two loaves of a new recipe. That was a mistake. IT IS SO GOOD. Like so soft and fluffy, the perfect sandwich bread. Am actually blown away. Thank you for sharing!
Natalie
I am so happy you liked it and this comment made me smile. It's my go to bread when I want something quick. If you love oatmeal bread, give that one a try. It's more waiting but whenever I make it the loaves don't last a day. Thanks for commenting - stay safe and well. -x
jack loganbill
Have successfully baked this recipe several times. Lately I made a few modifications: 1/3 cup sugar, slight Tbs. of salt, 1 Tbs. Milk Powder, 1 Tbs. Dough conditioner. THanks for sharing the great recipe.
Thomas D Turner
Total failure....................dough did not raise much at all in controled 170 degrees using "Fast Yeast" something differently went wrong..........will try a different receipe in the future....surely it was me that
didnt add up right................tom turner
Natalie
Dear Tom, I'm sorry to hear it did not work for you. I don't know what you mean by "Fast Yeast". I use Red Star active dry yeast and it's always risen beautifully. If you are high altitude, there's adjustments in the comments. Best, Natalie
Elaine Fallah
I made this bread twice now, came out great both times. I also used instant yeast. If you look at the pictures you can tell it doesn't rise quite as much as other recipes.
I use honey instead of sugar, and olive oil instead of butter. Its three days old now and still is good eating.
Most other bread recipes are stale by now.
Linda
I'm intrigued that there is only one rise to the dough. I didn't know you could do that. Does it have a different taste or texture to it?
Natalie
Hi Linda! Yes, the texture is fine and tight but the taste is still delicious. Using a tablespoon of yeast gives it a boost. It is also necessary to give it a warm place to rise. I have since changed ovens and I can no longer place them in an oven set at 170 degrees. Now, I place them in the oven with a pan of boiling water to give it a warm moist environment. No need to change the water after it cools. It is my go to recipe when I need bread in a hurry. It freezes well too. I hope you enjoy it!
Rick Buxton
Dear Natalie,
Thank you for sharing this wonderful recipe. I live at a high altitude (exactly 1 mile above sea level) and have been frustrated trying to make modifications to all the other bread recipes I've tried. I always end up with edible, but miserable failures. As far as I can tell, there are no bread recipes specifically for us "mountain folk." Believe me, I have searched. Anyone who hasn't experienced high altitude baking can never know how much frustration is involved when you follow a recipe to the letter, and things don't come out correctly. It all has to do with less air pressure and extremely dry air.
When I first tried your recipe, it too failed. Not because of the recipe, but because the effects of high altitude spoils many baked goods if modifications are not used. But, I knew this was a recipe I could work with.
After 4 or 5 tries, I finally struck upon the proper adjustments to make, and today, for the first time in years, I ended up with two nearly perfect loaves. The modifications were slight, but they made all the difference.
Should anyone visiting your site show interest in my high altitude adjustments, I would be happy to email you the recipe with modifications.
Again, thank you.
Yours truly, Rick
Natalie
Dear Rick,
I am so glad you were able to make the recipe work for you. Thank you so much for the kind words. I would love to share your modified recipe. Send it along at your convenience and I will post it.
Best,
Natalie
Natalie
I wanted to post this recipe that was modified for high altitude by Rick Buxton. Thank you, Rick, for putting time into testing this and sharing it with others. - Natalie
Single Rise White Bread
Modified for High Altitude (5000 feet above sea level)
2 cups warm water 110º F
1 tablespoons yeast minus 1/8 teaspoon
3 tablespoons sugar
4 tablespoons butter - unsalted, melted
1 tablespoons salt
6 cups unbleached flour (1.65 pounds) + 3 to 6 tablespoons extra if needed
Butter two 9x5 inch loaf pans.
Combine 1.65 pounds (approximately 6 cups) of flour with salt –mix well – set aside.
In the bowl of a stand mixer, add warm (110ºF) water and stir in sugar until dissolved, then sprinkle in yeast. Let proof until yeast foams - about 5 minutes. Add in butter.
With dough hook in place, add in flour/salt mixture and knead (speed 2).
If dough is too wet and forms a sticky mass on the bottom of the bowl after 7 minutes, add 3 to 6 tablespoons additional flour (1 tablespoons at a time) while still mixing until dough comes together - 12 minutes total kneading time.
Transfer dough onto lightly floured counter - knead briefly and fold until you achieve an even rectangle - divide the dough in half.
With one half, shape dough into a rectangle longer side facing you, width being same size as length of loaf pan.
Fold top of rectangle halfway over dough and pinch lightly to seal.
Bring up bottom of rectangle over to form a log shape. Pinch to seal.
Form an indentation across the length of the log shape using the side of your hand and then fold up bottom to meet top and pinch to seal. Be sure ends are pinched as well. (I used the side of my hand, like a gentle Karate chop)
Transfer dough, seam side down, into loaf pan.
Repeat with other half.
Gently cover both with lightly-oiled plastic wrap and place on lower-middle rack of a cold oven. (Heated only by the pilot light) (A kitchen towel allowed the top dry out)
Let rise for 30-35 minutes until the highest part (center) of the dough rises just above the rim of the pans by 1/4 to 1/2 inch. Do not let it over-rise.
Leaving loaves in the oven, remove plastic and set oven temperature to 375º.
Start timer when oven ignites. (Probably not a concern if using an electric oven)
Bake for 35 to 40 minutes until golden brown. Remove from pans and set on rack to cool.
Original Recipe by
Natalie | The Genetic Chef
http://www.thegeneticchef.com/single-rise-white-bread/